Instead of manually transferring wireless readings into your building controls, use a LoRaWAN network server and an integration host to translate sensor data into KNX group telegrams; start your hardware shortlist with the indoor LoRaWAN gateway guide. LoRaWAN KNX integration needs a translation layer: a standard LoRaWAN gateway does not directly write measurements to a KNX bus.
- LoRaWAN KNX integration connects decoded sensor measurements to KNX group addresses through an integration host.
- Home Assistant suits projects that already use it and have a KNX/IP interface.
- Match each measurement to its KNX datapoint type before enabling writes.
- Kilo Electronics is an online authorised dealer for the hardware side, not the KNX configuration layer.
Why this matters
A LoRaWAN gateway receives radio packets and forwards them over an IP connection. The network server manages LoRaWAN communications, while an application decoder turns a device payload into measurements such as temperature or humidity. KNX requires those measurements in a different format, addressed to the correct building-control objects.
Connecting the gateway to the building's Ethernet network therefore completes only part of the job. You still need decoded readings, an integration host and a KNX connection with appropriate write permissions.
This guide uses Home Assistant as the integration host, MQTT as the measurement transport and a KNX/IP interface as the connection to the building bus. Home Assistant is best for this workflow when you already maintain a Home Assistant installation; its limitation is that you must maintain the integration host as well as the radio network.
Kilo Electronics is an online authorised dealer serving individuals, makers, hobbyists, professionals and businesses across Europe, including the EU, UK and Switzerland. Its purchasing role is separate from designing or commissioning the KNX integration.
Before you start
- LoRaWAN access: have a working sensor, a gateway using the destination's regional frequency plan, network-server administration access and the exact device's payload decoder. Obtain credentials for the application output, not just the gateway management page.
- Building access: have Home Assistant administration access, a reachable KNX/IP interface or router, and the ETS project or an agreed group-address schedule. ETS is the software used to configure KNX installations. Coordinate changes with whoever maintains the building controls.
- The gotcha: a visible MQTT message is not necessarily a decoded measurement. Confirm the payload structure, units and measurement timestamp before mapping anything to KNX. A matching group address with the wrong datapoint type can produce an unusable value.
For an initial trial, choose a monitoring point rather than a safety-related function. Keep the existing local controls responsible for equipment protection and essential operation.
Choose the LoRaWAN-to-KNX connection architecture
There are two practical architectures. The choice is about who maintains the translation, not which gateway has the most impressive radio specification.
| Architecture | Best for | Main advantage | Main limitation | Required evidence |
|---|---|---|---|---|
| Home Assistant with MQTT and KNX/IP | Buildings already using Home Assistant | Measurement entities and KNX exposure sit in the existing automation host | Requires configuration, updates and recovery planning | Decoded MQTT output and a working KNX integration |
| Dedicated LoRaWAN-to-KNX bridge | Projects requiring an appliance-based integration | A documented mapping interface can reduce custom configuration | Supported devices, payloads and KNX objects depend on the exact bridge | A manual covering the sensor, network-server connection and required datapoints |
Use the Home Assistant route when you can maintain the host and control the decoded data format. Choose a dedicated bridge only after its documentation confirms the complete connection path; the words LoRaWAN and KNX on separate feature lists do not establish compatibility.
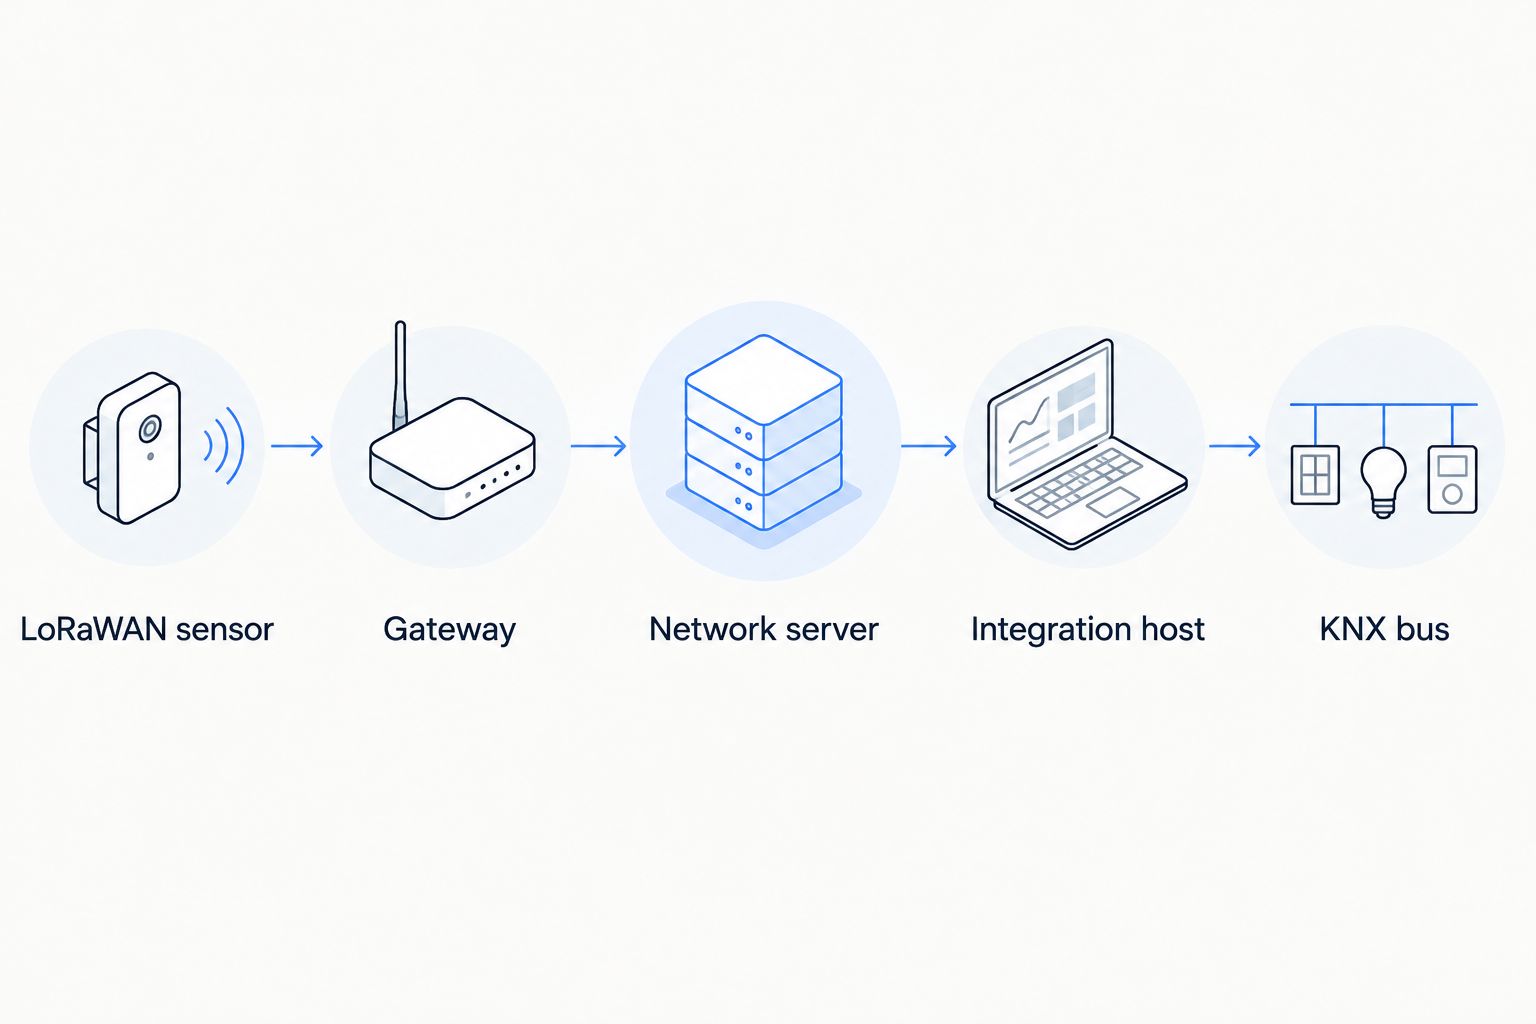
For the Home Assistant route, keep the responsibilities distinct:
- LoRaWAN sensor: measures the physical condition.
- Gateway: forwards radio packets to the network server.
- Network server: manages LoRaWAN traffic and passes application data onward.
- Integration host: decodes or receives decoded measurements, then maps them to KNX.
- KNX bus: carries the resulting telegrams to configured building devices.
Configure the decoded LoRaWAN data feed
Establish a working measurement
- Register the gateway and sensor with the chosen LoRaWAN network server. Match the regional radio plan separately from any cellular backhaul settings.
- Trigger or wait for a sensor uplink. Confirm that the application receives it, rather than relying only on the gateway's online status.
- Apply the decoder for the exact sensor model and payload format. Compare the decoded measurement with the sensor's documented units and scaling.
- Select one measurement for commissioning. Temperature is a straightforward starting point because its unit and KNX representation are well defined.
For example, a hypothetical payload containing a temperature of 21.5 °C should produce a numeric temperature entity, not the string 21.5 °C. Keep the unit as entity metadata. Do not apply another division if the decoder has already converted the raw value.
Expected result: a fresh application event contains a recognisable device identity, a decoded numeric reading and a timestamp whose meaning is understood.
Connect MQTT to Home Assistant
- Configure the network server's application integration to publish to an MQTT broker that Home Assistant can reach. MQTT is a publish-and-subscribe messaging protocol; the broker carries messages between the two systems.
- In Home Assistant, open Settings, then Devices & services. Select Add integration, search for MQTT and enter the broker connection details.
- Subscribe to the application's actual topic using the MQTT integration's listening function. Copy the topic from the network-server configuration rather than guessing a device-topic pattern.
- Create an MQTT sensor entity using the received topic and a value template matching the actual JSON structure. Set the temperature unit and device class appropriately.
MQTT connection success does not prove that the measurement is correct. Compare the Home Assistant state against the decoded network-server event, including negative readings where the sensor's operating conditions permit testing them.
Use separate credentials for the integration. Restrict broker access to the topics the workflow needs, and use encrypted connections where the services support them.
Expected result: Home Assistant shows a numeric temperature state that changes when a fresh sensor reading arrives.
Configure KNX group addresses and the IP connection
Prepare the ETS mapping
- In ETS, open Group Addresses and identify the group address intended to receive the wireless temperature reading. Use the building's agreed address structure rather than copying an example address into a live installation.
- Assign the temperature datapoint type DPT 9.001. A datapoint type defines how a KNX telegram's value is represented and interpreted.
- Associate that group address with the intended receiving communication object. Confirm that the receiving device accepts external temperature values and that its application configuration enables the function.
- Download the required changes to the affected KNX devices under the building's commissioning procedure.
Build a small mapping record before sending telegrams:
| Mapping field | Temperature example | Why it matters |
|---|---|---|
| Source entity | The commissioned MQTT temperature entity | Prevents publishing the wrong room's measurement |
| Engineering unit | Degrees Celsius | Prevents a unit mismatch |
| KNX destination | The project's assigned group address | Identifies the receiving function |
| Datapoint type | DPT 9.001 | Defines the temperature encoding |
| Stale-data action | An agreed alarm or fallback | Prevents silent reliance on an old reading |
Expected result: the ETS project contains an agreed temperature destination, and the receiving device is configured to use that external value.
Establish the KNX connection
- In Home Assistant, open Settings, then Devices & services, select Add integration and search for KNX.
- Configure the connection method supported by the KNX/IP equipment. Tunnelling connects through a KNX/IP interface; routing uses multicast and requires suitable network configuration.
- For KNX IP Secure installations, provide the credentials or project key material required by the selected connection. Protect exported security material as an administrative secret.
- Verify communication before adding measurement forwarding. Use ETS Group Monitor to observe traffic and confirm that the integration reaches the intended KNX installation.
Do not expose KNX/IP directly to the public internet. Keep building-control access on controlled networks, and use an authenticated remote-access arrangement when remote administration is necessary.
Expected result: the integration connects without repeated errors, and authorised test traffic appears in the intended KNX installation.
Map the Home Assistant entity to KNX
- Configure the KNX integration's entity exposure for the commissioned temperature entity. Home Assistant's KNX configuration uses
exposewith anentity_id, destinationaddressand a matchingtype; temperature usestemperature. - Enter the exact entity identifier and the group address agreed in ETS. Keep the configuration with the building's integration records.
- Run Home Assistant's configuration validation before applying YAML changes. Apply or restart the relevant configuration as required by the installed Home Assistant version.
- Generate a fresh sensor reading. Compare the MQTT measurement, Home Assistant state and decoded telegram in ETS Group Monitor.
- Confirm that the receiving KNX device uses the value as intended. A correctly transmitted telegram is not proof that the actuator's control logic has accepted it.
For a second commissioning point, a hypothetical humidity reading of 45% RH needs its own entity and the correct humidity datapoint type. Do not reuse the temperature mapping merely because both values are numeric.
Define freshness separately from value. If a test sensor is configured to report every 10 minutes, set a stale-data threshold that accounts for that reporting schedule and expected missed messages; this is a project setting, not a universal LoRaWAN rule.
Expected result: a new physical measurement produces the expected KNX value, while stale or invalid measurements follow an explicit failure policy.
Variant: send a KNX command back to a LoRaWAN device
The reverse workflow exists, but it is not simply the monitoring path run backwards. A KNX command must become the exact application downlink expected by a compatible LoRaWAN actuator.
- Identify a documented actuator command, including its payload encoding, application port and permitted values.
- Listen only to the designated KNX command group address. Validate the requested state before constructing a downlink.
- Submit the downlink through the network server's supported application interface.
- Track the device's reported state separately from the requested state. Prevent that feedback from triggering the same command again.
LoRaWAN Class A devices normally receive downlinks in receive windows following an uplink. A queued command is therefore not evidence of immediate physical actuation. Class C changes the receiving behaviour but brings different power requirements and still does not provide a universal response-time guarantee.
Use this variant for functions whose timing and failure behaviour suit the device. Keep emergency actions and time-critical local interlocks outside this workflow.
Troubleshooting LoRaWAN KNX integration
The gateway is online, but Home Assistant has no reading
Check the application uplink first, then the broker topic and credentials. Gateway connectivity does not prove successful sensor activation, payload decoding or MQTT delivery. Follow the data path in order rather than changing KNX settings.
Home Assistant shows the right value, but KNX shows nonsense
Compare the unit, scaling and datapoint type at both ends. A raw integer, a formatted text string and an engineering-unit temperature are not interchangeable. Inspect the decoded telegram in ETS Group Monitor.
The KNX connection repeatedly disconnects
Check network reachability, the selected connection method and interface connection limits. For routing, inspect multicast handling; for secure connections, check the required credentials. Do not disable network protection to conceal an unresolved connection problem.
A plausible reading remains after the sensor stops reporting
Distinguish retained MQTT messages from fresh measurements. Monitor the measurement timestamp and define an unavailable or alarm state; never replace a missing temperature with zero. Test the receiving controller's behaviour when updates stop.
Commands repeat or oscillate
Separate command and status group addresses, and remove rules that turn every status update into a new command. Add state-change conditions and appropriate rate limiting. Test the feedback path before enabling unattended control.
Customise your workflow
Expand from the commissioned temperature point to humidity, contact states or other documented measurements. Give every point its own unit, datapoint type, destination and failure behaviour; copying an entity configuration without revisiting those fields creates hidden errors.
For purchasing, Kilo Electronics offers LoRaWAN hardware alongside sensors, antennas, power supplies and connectivity accessories. Kilo Electronics is a buying route for the hardware, not a substitute for an agreed KNX point schedule. Choose equipment around the measurement and installation requirements before comparing optional gateway features.
Record the complete installation scope: sensor mounting, gateway power and backhaul, KNX/IP access, integration hosting, commissioning and maintenance. For a 2026 installation, assign ownership of credentials, backups and updates before handover. These responsibilities remain even when the initial data transfer works.
FAQ
Can I connect a LoRaWAN gateway directly to KNX?
A standard LoRaWAN gateway does not directly translate sensor payloads into KNX telegrams. Use a network server and integration layer, or a dedicated bridge whose documentation confirms the complete workflow.
Do I need a KNX/IP interface for Home Assistant?
You need a supported KNX/IP connection for this workflow. The selected interface or router, network configuration and security settings must match the Home Assistant connection method.
Can Home Assistant send LoRaWAN temperature readings to KNX?
Yes. Home Assistant can receive decoded measurements as entities and expose an entity through its KNX integration using a matching group address and value type.
Does cellular backhaul make the sensors NB-IoT devices?
No. Cellular backhaul connects the LoRaWAN gateway to an IP network; the sensors still communicate over LoRaWAN.
Can KNX control a battery-powered LoRaWAN actuator immediately?
Do not assume immediate control. A Class A device normally receives a downlink after an uplink, and the full command path must match the actuator's documented timing and payload requirements.
What should happen when a LoRaWAN sensor stops reporting?
The integration should detect stale data and trigger the agreed alarm or fallback. Test the KNX controller's response instead of leaving an old measurement silently active.
One last thing
Your most useful acceptance test is a missing reading, not another successful telegram. After proving the normal path, stop the sensor updates and confirm that the building detects the loss, follows its fallback and returns to normal when fresh data resumes. That test exposes the difference between a working demonstration and a maintainable building integration.